IOS SDK
Outcome: Integrate Paymob's native iOS SDK
Installation
You can install the iOS SDK in one of two ways. Choose only one method.
Option 1: Cocoa installation
PaymobSDK is available through CocoaPods.
Step 1: Add Pod Dependency
Simply add the following line to your Podfile:
pod 'Paymob'Step 2: Install Pods
Run pod install command in the terminal
Step 3: Open Workspace
Open your project using the.xcworkspace file
Step 4: Change the embedding option to "Embed & Sign"
In the general settings of your project, under libraries and frameworks, change the library from "Do not embed" to "Embed and Sign"

Manual Installation
Step 1: Download the SDK
Download the SDK from the provided link and extract it on your local machine.
Step 2: Add the SDK files to your project
Copy the extracted SDK files and place them inside your project’s folder structure.
Step 3: Add the SDK to Xcode
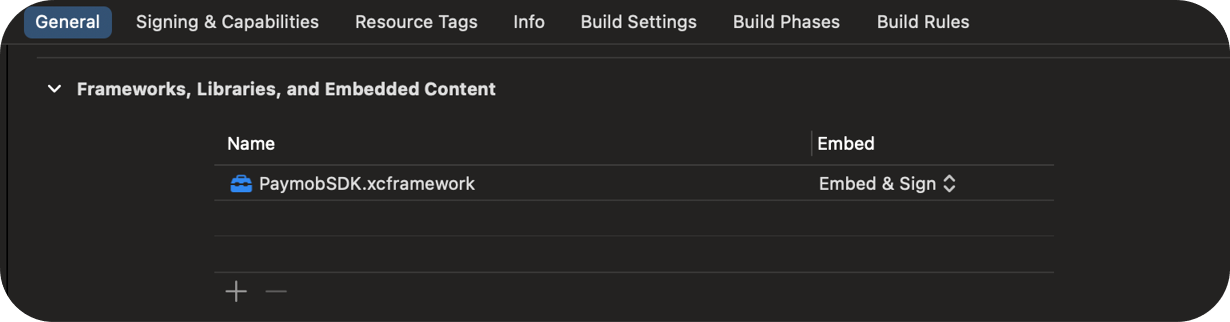
Open your project in Xcode, then drag and drop the PaymobSDK.xcframework into General → Frameworks, Libraries, and Embedded Content.
Step 4: Embed and sign the SDK
In Frameworks, Libraries, and Embedded Content, change the SDK option from Do Not Embed to Embed & Sign.
Usage
Step 1: Import the framework
import PaymobSDKStep 2: Add the delegate to the class, and add the protocol stubs
class ViewController: UIViewController, PaymobSDKDelegate {It should look like this.
 extension ViewController: PaymobSDKDelegate{
    func transactionRejected() {
        print("Transaction Rejected")

    }

    func transactionAccepted(transactionDetails: [String : Any]) {
        print("Transaction Successfull: \(transactionDetails)")
    }

    func transactionPending() {
        print("Transaction Pending")
    }
}Step 3: Create a constant
let paymob = PaymobSDK()Step 4: Pass self to delegate
paymob.delegate = selfStep 5: Create the variables
 // Replace this string with your payment key
let client_secret = "" //Put Client Secret Here
let public_key = "" // Put Public Key Here
Client Secret
A unique, intention-specific token used to redirect the customer to Paymob’s Unified Checkout or to render Paymob’s Pixel component.
Public Key
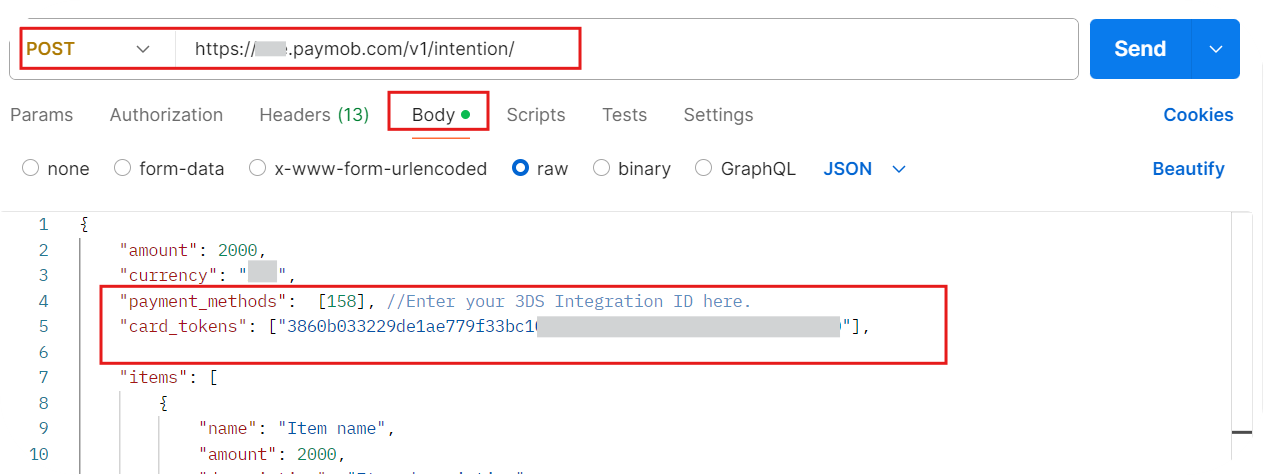
If you’re using saved cards, pass the saved token as a string in the
card_tokens array when calling the intention creation request
Step 6: Customize the UI of the SDK
You can customize the UI of the SDK, such as
 // the extra UI Customization parameters are

//sets the title to be the image you want
appIcon

//sets the title to be the name you want
appName

//changes the color of the buttons throughout the SDK, the default is black
buttonBackgroundColor

//changes the color of the buttons Texts throughout the SDK, the default is white
buttonTextColor

//set save card checkbox initial value
saveCardDefault

//set whether or not should show save card checkbox
showSaveCard

//used like this
let paymob = PaymobSDK()

paymob.paymobSDKCustomization.appIcon = UIImage()
paymob.paymobSDKCustomization.appName = ""
paymob.paymobSDKCustomization.buttonBackgroundColor = UIColor.black
paymob.paymobSDKCustomization.buttonTextColor = UIColor.white
paymob.paymobSDKCustomization.showSaveCard = truepaymob.paymobSDKCustomization.saveCardDefault = false

try paymob.presentPayVC(VC: self, PublicKey: public_key, ClientSecret: client_secret)
paymob.paymobSDKCustomization.saveCardDefault = false
Step 7: Run the SDK
 do{
    try paymob.presentPayVC(VC: self, PublicKey: public_key, ClientSecret: client_secret)
} catch let error {

}What made this section unhelpful for you?
On this page
- IOS SDK